Thursday, December 31, 2015

First draft of CUT track plan

I probably shouldn't have posted this right on top of a Wordless Wednesday post, but oh well it's my blog and I can do what I want with it.

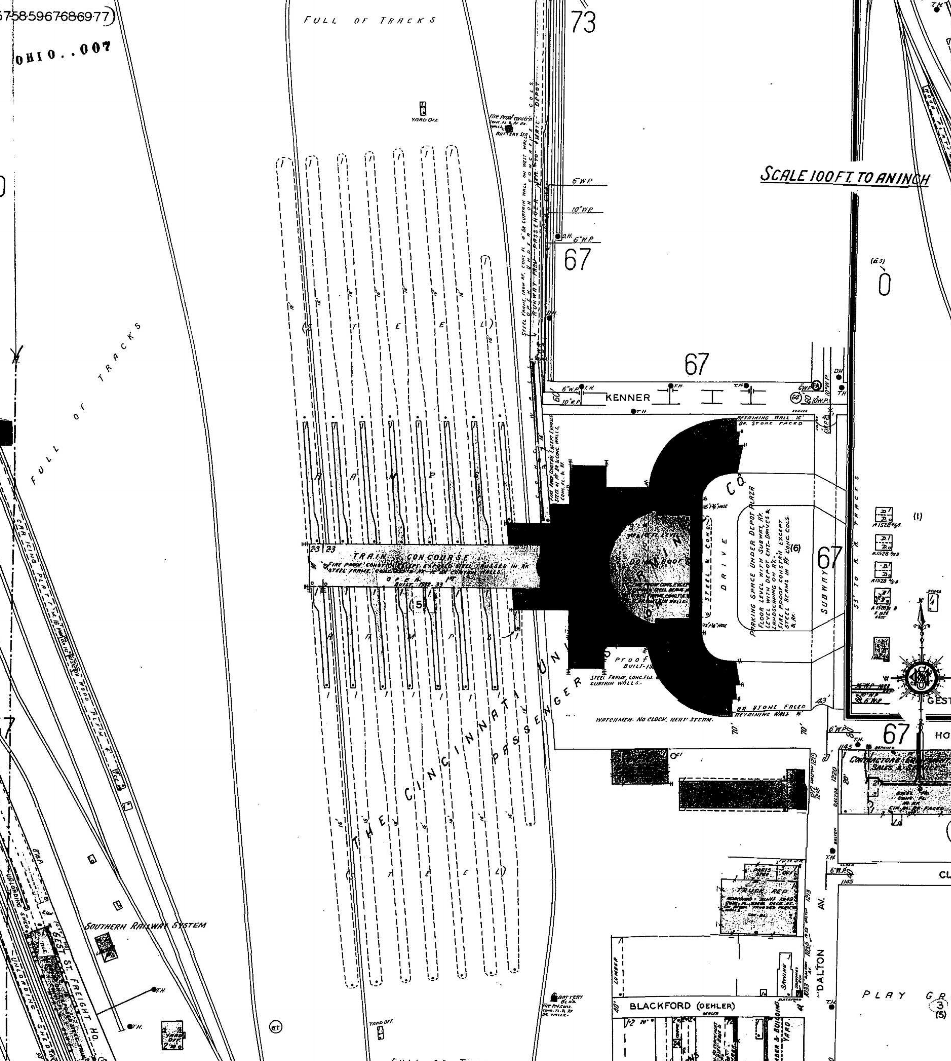
Here is a shot of my first attempt at a somewhat doable CUT track plan, at least for the terminal area. Well, it's not really doable because it is way too long at 36' length, especially since the connections to the rest of the layout on the left end are not even there yet. I'm about at the limit on length because the left end needs to be kept open (to a degree) for movement to and from the basement steps and the rest of the basement. The brown square in the lower right must be kept clear for access to my electric panel.

This plan has all the major elements I am looking for in the terminal. Minimum radius on passenger tracks of 40". I wanted to do #8 turnouts but they are too long, so these are all #6. Also, a #8 double slip switch has 4 throwbars instead of 2 for the #6. There are 5 platforms at the terminal with the longest platform track being 11'  long. There are two sleeper stubs and also runaround tracks along the top and the bottom of the terminal. There is mail, express, commissary & Pullman, coach yard, and locomotive service. There is a certain level of challenge to the trackwork from an operational point of view, but it isn't beyond reach from the constructional point of view. A 130' turntable tops it all off. The loop around the roundhouse area actually existed at the real CUT for turning entire strings of passenger cars rather than doing them one at a time on the turntable.

I can envision stacking dogbone loops under the turntable loop and staging yards underneath the terminal tracks.

Next step is to maybe bend it somehow or figure out other ways to reduce the overall length. If I can bring the left end in about 10', it will give me room there to extend those connections to the rest of the layout.


Wednesday, December 30, 2015

Not So Wordless Wednesday #3

Norfolk & Western Class J 602 preparing to leave with the Powhatan Arrow at Cincinnati Union Terminal


I just can't resist commenting on this photo. The more research I do on Cincinnati Union Terminal, the more excited I become to model operations there. The N&W J Class locomotives were used on their named trains such as the Powhatan Arrow, Pocohontas, and The Cavalier, all of which were Norfolk to Cincinnati trains although The Cavalier switched its terminus from Cincinnati to Portsmouth OH by 1957. Interesting to note is the N&W was very late to dieselize its passenger fleet and ran all steam up to that same year.

Now all I need to do is get my hands on an HO scale version of one of these beauties.

EDIT: The original caption when I first posted this photo read that the Powhatan Arrow pictured above had just arrived at the terminal. This is incorrect because in 1952 the westbound train arrived at the terminal at 10:45pm and would have been facing the other direction upon arrival. N&W approached and egressed from CUT from the north end (railroad east) of the terminal. In the photo we are facing south-southwest and the sun is obviously fairly low in the eastern sky (to the left) which is evident from the lighting and shadows. Although we don't know what year this photo was taken, in 1952 the Powhatan Arrow left CUT for Portsmouth OH at 8:20am, so it is safe to assume this shot was taken in the morning sometime around when the train would have been leaving the station.

Wednesday, December 16, 2015

Monday, December 14, 2015

Scale track plan of Cincinnati Union Terminal

Just to see if it could be done and to say that I did it, I used AnyRail5 to make a loose scale track plan of Cincinnati Union Terminal, using this diagram:


Here is the end result. It actually fits in my train room. The entire train room (13' x 46'). The 8 platforms are about 1400' long instead of the 1600' that they really were. Other than that, it is pretty close although I did have to freelance in a few places to get the trackwork to align. I had to use #6 turnouts instead of #8's like I wanted to because the #8's made it about 10' longer, but then again this is just an experiment.


The bill of materials, track only:

44 x #6 Double Slip switches
45 x #6 Left turnouts
46 x #6 Right turnouts
24 x #6 Wye turnouts

Grand total of 841' of track.

Now that I have the Full Monte, I can begin the selective compression process. The remarkable thing is even in the full blown state it is in right now it is only just under 6' wide.

The terminal throats and ladder trackwork are very interesting and were designed with ease of operation in mind. The terminal was designed to allow switchers to buzz around both ends of the terminal to switch cars to and from passenger trains that may only be in the station for a few minutes, all without interrupting the traffic flow of the trains coming and going. Everything is double tracked at a minimum and in some places it is 3 or 4 parallel tracks and there are plenty of crossovers and double slips to allow the switchers to go around traffic.

Boiling the plan down to a workable size while still capturing the feel of it will be the challenge. This is the part where Cleveland Union Terminal gave me a headache.

Here's a copy of a Sanborn map that shows how the platform widths conform to the transition from double track under the concourse to triple track towards the ends of the platforms.


Saturday, December 12, 2015

Did I say CUT? I meant to say CUT.

You are not in the wrong place.

As much as I have tried to come up with an acceptable plan for Cleveland Union Terminal over the past few months, I finally reached the point where I was spending a lot of time getting nowhere and I have decided to abandon the Cleveland Union Terminal project. I now switch the focus of my project to the Cincinnati Union Terminal.

Here are some of the problems in modeling Cleveland Union Terminal.

  • All of the passenger platforms are underneath the station. This essentially would turn the terminal into hidden staging. I want to be able to see the beautiful passenger trains parked at a platform. I also want to be able to access couplers to switch out cars in a passenger consist, although at Cleveland I have come to realize that there wasn't a whole lot of consist switching going on there. Kind of hard to do that underground nonetheless. I thought about using a material such as lexan or plexi to allow the platforms to be viewed, but I never could visualize that as having any semblance of a realistic looking model and it still wouldn't fix the accessibility issue.
  • "Selective Compression" ended up never looking the way I wanted it. As mentioned in previous posts, to model the terminal to scale would take up the entire train room at 13' x 27'. Selective compression to reduce the model to an acceptable size to still have room for more layout just wasn't doing it for me.
  • The more research I did on Cleveland Union Terminal, the more I discovered how much the place was disliked by the railroads that used it (and the one that didn't use it - PRR). This had the undesirable secondary effect of also causing me to dislike it! I eventually found myself trying to reduce the passenger operations to more of a background role and focus on freight operations, but that is not what I set out to do. I ran into one description of CUT during WWII and it was described as "CUT was a dismal place during and after WWII. The beautiful skylight windows in the main concourse were painted over black during WWII and it had the effect of darkening the whole place, giving it a sort of dungeon feel". Hard to keep positive thoughts about a place with a description like that.
  • Electrified operation by CUT power. This would not normally be a big deal, but the P-1a's used by CUT are only offered in HO scale by one manufacturer at $1000 each. That makes it a big deal. The P-1a's were still in use during the time frame that I wanted to model, so removing them from the picture just didn't seem right.
I could go on.

Exit CUT, enter CUT.

One day a few weeks ago while doing some research, I entered "Cleveland Union Terminal" into a search engine bar. Other suggested searches popped up as usual, but one caught my eye and that was "Cincinnati Union Terminal". I clicked on it and the rest is history.

Things I like about Cincinnati Union Terminal.
  • Open platforms. I am really looking forward to modeling a station with open platforms.
  • I really dig the Art Deco appearance of the terminal. It almost has a Gotham City look to it. Indeed, the DC Universe Hall of Justice is modeled after it.
  • There are SEVEN railroads that use Cincinnati Union Terminal. B&O, C&O, N&W, PRR, NYC (CCC&StL or Big Four), L&N, and Southern. CUT was one of the busiest railroad passenger terminals in the country.
  • Hand in hand with the above bullet, I already have a starting collection of HO scale passenger equipment from B&O, C&O, and PRR. If I had stuck with Cleveland Union Terminal, most of that equipment would not be of any use.
  • The terminal appears to be easier to scale down by selective compression and the trackwork will be easier. In reality each of the 8 platforms was 1600' long but the yard throats are essentially straight in. I struggled with this on the Cleveland terminal because the throats on both ends are on nearly a 45 degree angle to the platforms. The shorter I made the platforms at Cleveland, the more it made the whole terminal look like it was on one big curve. 
  • The express & mail facilities are separate but adjacent to Cincinnati Union Terminal. At Cleveland it was all done on the passenger platforms, again - all underground.
  • The coach yard and engine facilities are separate but close to the terminal. At Cleveland the coach yard was part of the terminal but there were no locomotive service facilities there.
  • I still have a river to model (the Ohio River). Not as crooked as the Cuyahoga River though.
  • The real thing still exists as a passenger station (albeit on a much smaller scale and now with only Amtrak), and it is also within a day's drive if I want to go see it in person.
I am one of those guys that really hates to admit defeat, but sometimes you just have to move on.

Wednesday, December 9, 2015

The inaugural Wordless Wednesday, First Edition.

Ok, so a lot of fellow bloggers have Wordless Wednesdays, Throwback Thursdays, etc. I've been really racking my brain daily trying to come up with a workable plan to fit CUT into my 13 foot x 30+ foot basement, so far unsuccessfully. Quite frankly, I'm getting tired of layout planning and am ready to get some benchwork started. So, to keep the blog going, I'm jumping on the train.

Anyway, here's my maiden voyage of Wordless Wednesday and it kind of sums up where I'm at with planning CUT. Wordless Wednesday #1 begins after I shut up.


Monday, October 26, 2015

Go Big or Go Somewhere Else. Or, "How to make it fit?"

It's been a few weeks since I posted. We are now in the new house and I am about ready to start construction.

I have come to the realization that everything in Cleveland is BIG and would still be BIG if scaled to HO. CUT is almost 27' long in HO scale as I have illustrated in a previous post. The NKP Broadway Av Freight House was about 650' long in real life, or about 7 1/2' long in HO scale.


Everything will have to be downsized. Model railroaders struggle with that reality constantly, and it is nothing new. The key is how to downsize something and still make it look good.

Here is a photo of downtown Cleveland taken facing NE. When you look at the photo, you can really visualize how you could construct benchwork out of this scene. The Cuyahoga River would be aisleways between blobs or peninsulas. Unmodeled area would be backdrop against a wall and/or access room behind peninsulas.


I've really been trying to figure out how to make CUT fit in my basement.

Jason Cook started a thread on this very same topic over at the Yahoo Groups Proto-Layouts group and I have chimed in on the thread with my case.

Cheers

Saturday, September 26, 2015

Photo opportunity with NKP 765

It's not everyday you get a great opportunity to be in a photo with a classic steam locomotive like NKP 765.

She was in town leading a train with the Cuyahoga Valley Scenic Railway for their annual Steam in the Valley event. It just so happened that the Akron Marathon was also taking place today. I was on the marathon escort detail on our police motor unit and I knew 765 was going to be there around 11am. We got a small window of opportunity to go shoot a few pics of her before she left. Much to our surprise, the engineer said we could park our bikes right next to her and get some photos. I'm second from the right...


Saturday, September 19, 2015

Some great resources for model railroading research

As I research Cleveland Ohio and Cleveland Union Terminal for my model railroad, I am reminded of my time as a student in the US Army Command & General Staff College. For those that don't know, CGSC is a graduate-level course for Army Majors hoping to become Lieutenant Colonels that covers topics such as leadership, military doctrine, military history, and operational art, to name just a few.

I spent a lot of time in CGSC writing papers as the culmination of researching a given topic. It was no different than any other graduate-level course where you receive a list of questions about a topic and you have to pull research from many different sources and then essay the answers to the questions.

That's kind of what I feel like I am doing here in planning my model railroad. There are so many sources to research from, but the product of the research will be the layout rather than a paper. In the planning stage, you can use one (or more than one) of the CAD-based software programs (I am using AnyRail 5) to create your track plan. Just like writing a paper, with the software you can easily go back and make changes to the plan or even start a completely new one as you develop your final product, and the only thing it costs you is time.

While writing a paper for school, eventually you have to turn it in and at that point no more changes can be made. Building a model railroad, once you start to put track to benchwork with spike or adhesive, you are pretty much turning in that paper and while you can always make changes to a layout, now it becomes more difficult to make them. Long story short: you probably better have your concept and plan realized by that point or now it becomes very painful (and costly - in time and now money) to make drastic changes. I hope to make sure everything is the way I want it before it becomes permanently attached to the benchwork. I'm sure this will be more difficult than I think it is.

Ok, back to model railroading research.

I've found a lot of research sources for CUT and 1940's-1950's Cleveland, some of which I have mentioned in earlier posts. There is the Cleveland Memory Project and it's excellent photographic collection from the construction of Cleveland Union Terminal. You can find it here. Most of the photos are from the 1920's up to 1930, when CUT opened for business. The problem is there are no photos from the operational period (1930-1970-ish) of the terminal in the collection.

I have found a few other resources that I think all model railroaders can use for researching their layouts. One is Historic Map Works, which they say has 1,662,956 historical maps & images. They have a collection of the Hopkins plat maps of Cleveland from the 1930's, which I have found invaluable for track planning because the maps are scale drawings to include all rail lines and who owns them. They also show who owns a particular building and what type of construction - brick, stone, frame, etc.

Another great source of material is the Library of Congress at http://www.loc.gov/. They have an extensive online library to include photographs from all time periods in US history. At the top of the home page is a search bar and if I type in "Cleveland Union Terminal" I get 342 results, everything from photos, prints, and newspapers, to drawings, maps, and diagrams. In particular, I found a collection of 161 photos from a Historical American Buildings Survey of Cleveland Union Terminal from the late 1980's. Included in those photos are three .tif file images of the original blueprints from the terminal from the 1930's that detail the three main levels of the station. More on those later in another post.

Finally, one resource I've been searching for and finally found is an online version of The Official Guide to the Railways. There is an online version of the August 1952 publication available here. For anyone modeling passenger operations, the Official Guide is indispensable. It has full timetables for passenger trains and it also gives you a pretty good idea of what cars a given train ran with and what cars got switched in and out of the train at certain stations.

Now, back to typing my paper...

Monday, September 7, 2015

First recon & pictures of the train room

Went down into the basement of the new house today to check out the future train room. We still haven't moved in and the current owner hasn't moved out yet, but we have access to the house. We have steadily been moving stuff that we can move in our cars from our current house into the new house.

This is the train room. From where I am standing to take this shot to the far wall is 46'. The distance between the left and right walls is just under 14'. The doorway leads to the other half of the basement. The stairs leading into the basement are to my immediate left.


From the far corner of the doorway to the far wall is just under 28'. The doorway is 36" wide. The plan for the layout space is to go along the left wall from the far edge of the doorway down to the back wall, wrap around to the right wall, and back this direction roughly even with the closer edge of the doorway or about 31'. That will leave me with about a 14' x 15' area from the doorway to the stairs to finish as a lounge/man cave area. This entire half of the basement will be finished from floor to rafters.


As an added bonus, I bought all the power tools in the photos from the owner of the house for $400. I picked up a mini scroll saw/sander with moto tool attachment, a band saw/sander, a floor drill press, and a table saw. I'm anxious to put them all to work on the layout.


Except for one corner here in the train room, the basement is dry. There is a downspout with below ground drain pipe at this corner of the house and I suspect the drain pipe is blocked or broke and this is from water seeping through the foundation from the downspout. Hopefully all it will take to fix is un-blocking the downspout drain or at the most digging the old drain pipe up and replacing it, then cleaning and treating the block from the inside. I don't know if maybe this was caused by an old problem that was fixed already or if it is current, so I'll clean it up first and check the downspout to see if it continues.


I'm wondering if I need to upgrade the electric panel. I would like to add at least two circuits dedicated to the train room, one for lighting and another for outlets, but this panel looks like there is no more room for circuits. I'm not much of an electrician, so maybe extra circuits can be added and all I have to do is get a new facing panel to accommodate more breakers. I may also have it moved to another part of the basement out of the train room.


I can't wait to get started on the prep work, and I plan on starting as soon as I move in. Getting the basement ready for the layout isn't going to be easy and it isn't going to be cheap, but I want to do it right and make it a great space for the layout.

Cheers

Jeff

Saturday, September 5, 2015

CUT scaled to the train room

More for the entertainment value than any realistic modeling approach, I made a scale graphic of what the actual CUT would look like in my train room.


The red lines around the border represent the walls of the train room portion of the basement. To scale the CUT map over the train room, I used the real distance along the length of Huron Rd. between the intersections of Superior Av and Ontario St. This is right around 2300' which is about 26.5' in HO scale. It just so happens that the wall along the bottom of the drawing is 27' from left wall to the doorway on the right side. If I was to build an HO scale model of Cleveland Union Terminal, it would take up my entire train room. Obviously that won't work.

The logical next step would be to figure out how to scale it down to realistic dimensions. My intent for the time being is to treat the CUT as a separate Layout Design Element (LDE) that will most likely get added to the layout further down the road. I do not want to try to tackle building CUT right off the bat.

Here is one rough draft of a possible track arrangement as an LDE. Rulings are 12". It uses 8 station tracks (upper 8 tracks) and 4 tracks for the coach yard. I think this track arrangement would definitely fit somewhere in the room and would still make a decent scaled down representation of CUT.


I may put in some stub tracks at the bottom of the coach yard for passenger car servicing facilities. The key to making this thing fit will be using curved turnouts and double slip switches. All of the turnouts above are #8 and the sharpest curve track is 40" radius. The longest station track is just over 8' long, so I may add another 1'-2' of length to this arrangement to allow a train of 8 cars of 85' length plus an A-B-A locomotive set. Right now this track group is right at 30" of depth which was one of my limits because of arm reach.The beauty of doing the design in AnyRail5 (or any similar model RR design software) is I can rotate and move the entire group of tracks around to see how it would fit elsewhere and see what I need to do to make it fit in a specific spot.

Jeff

Monday, August 31, 2015

How to model Cleveland Union Terminal in HO Scale?

A little history first.

Cleveland Union Terminal was quite a large passenger station. Construction was started in 1926 and the terminal was officially opened in 1930. The tower, today known as Terminal Tower, is 771' to the tip of the spire. The passenger and traction platforms were built below street level, under W. Huron Rd and W. Prospect Av.

There are some excellent online resources about the history of the Cleveland Union Terminal. Cleveland State University's Michael Schwartz Library has an online collection called the Cleveland Memory Project. Part of the Cleveland Memory Project is a large collection of photos from the construction of the Cleveland Union Terminal from the late 1920's and early 30's. You can find it here: Cleveland Memory Project

One of the unique features of Cleveland Union Terminal was that it was completely electrified by overhead catenary. This was because the City of Cleveland wanted to restrict passenger steam locomotives from operating under the terminal. Cleveland Union Terminal operated its own fleet of New York Central P-1a electric locomotives to run the passenger trains in and out of the terminal, with the steam-to-electric swap occurring at Collinwood Yard east of the terminal, and Linndale Yard to the west. Once railroads started swapping out steam locomotives for diesels beginning in the late 1930's for their best passenger trains, the diesel powered trains were able to make the run into the station under their own power. Some crack steam trains were still allowed to run into CUT, such as NYC's Mercury pictured below.

The Cleveland Mercury (Cleveland to Detroit) westbound out of Cleveland Union Terminal in 1936


Layout of the Cleveland Union Terminal.


In the diagram you can see that there are 28 tracks total at the terminal, and 26 of the 28 tracks were through tracks. In addition there were a few stub tracks in the coach yard service area, and stubs at the ends of some of the platforms. Presumably these are for spotting sleeper cars for early occupation the evening before next morning departure.

The above diagram doesn't really do justice to the size of the terminal. The distance from the intersection of Huron & Superior to Huron & Ontario is around 2300'. That's 26' in HO scale! It's also about 700' from the northernmost platform to Canal Road at the bottom, which is about 8 & 1/2' in HO scale.

The question now becomes, how the heck do I model this thing in HO scale and still make it look like a large city passenger terminal? There is no need to model 26' of passenger platform in HO scale. The longest passenger train I will probably operate will be about 10' long. To model all 28 tracks would require 8'6" of benchwork depth which would require hidden access to the back 2/3rds of the tracks.

Another unique feature of CUT is the fact that there was a large coach yard with service facilities, and mail & express service all within the terminal area. I need to model all of those pieces as well to have realistic passenger operations.

So how big or small does my version of Cleveland Union Terminal become?

East approach to CUT taken from Terminal Tower facing east. Catenaries, CT Tower (just below the freight yard) and Cleveland Electric Illuminating Company (the collection of smokestacks to the left of the freight yard) are all visible. The freight yard belongs to Baltimore & Ohio RR.

West approach to CUT facing west. The building in the foreground is the Huron St. entrance to the passenger station concourse. The US Post Office will relocate its main Cleveland location to a building that will be built over the gap just above the concourse building. Detroit-Superior viaduct in upper left of photo. Terminal Tower just off right side of photo.

Thursday, August 27, 2015

Some more planning considerations:

  • 30" minimum radius on visible passenger tracks
  • #8 minimum turnout size on visible passenger tracks
  • 8' minimum length for any siding intended for holding an entire passenger train
  • 2" minimum centerline parallel track spacing
  • 24" minimum radius on visible freight tracks & hidden staging
  • #6 minimum turnout size on visible freight tracks & hidden staging
  • 30" maximum benchwork reach to wall/dividers
  • 24" minimum aisle space
Here is a drawing (AnyRail 5) of my train room with 30" benchwork (in yellow) around the walls (red border lines). No peninsulas or islands drawn yet at this stage. This half of the basement is actually 13' x 46' but I'm only going to use 30' of the long dimension along the south wall (for now...) because the stairway is against the west wall in this half of the basement. The remaining 16' to the west wall & stairs from the edge of the benchwork I plan on finishing as a small lounge area. The doorway on the north wall leads to another 13' x 60' part of the basement which I have no plans on using for trains (for now...) and is the only access to that part of the basement. The furnace, laundry area, well pump, water heater, and storage areas are all in the north half of the basement. The east wall is the common wall to both halves of the basement and the north wall is the dividing wall.


Here's one track arrangement with the station in a corner, everything fits within the constraints above. Note that 2 double slips are used to save space in each approaching throat. I'm not sure if I like it to be all on a curve though, I may have to increase track spacing a little in that case. I also don't think there would be much room for anything else in the corner. It could work though. The shortest track is under 8' but it is the inside track which would be a coach yard track and doesn't have to hold a whole train. The shortest terminal track is the outside at 112" which is good.


I can see already before even putting any track down that my idea of putting the passenger terminal in a corner is probably not going to be ideal and stay within my constraints above. Of course, the only thing set in concrete here are the physical dimensions of the basement. 

Now is where the creativity begins...

Monday, August 17, 2015

Welcome to my blog, Crooked River rails.

This blog is about my HO scale model railroad based on the area around the Cuyahoga River in downtown Cleveland Ohio, circa late 1940's to early 1950's.

Right now the model railroad is in the conceptual stage. The main reason for this is because I have yet to move into the house where it will be built. That will change very soon, however.

I will have roughly a 14' x 30' area to work with to build my layout. I say roughly because there is potentially more room available, but the 14' is at least the primary locked dimension due to the basement walls. If I break through a dividing concrete block wall or extend the long dimension some, I can make it bigger. For starters though, 14' x 30' will be plenty.

I do not even have a full list of my givens & druthers yet. I am pretty sure that I want to include the following at least:

  • Part of the Cleveland Union Terminal station. I won't be able to model Cleveland Union Terminal to scale because it is 771' to the top of the antenna spire which is almost 9' tall in HO scale. Trust me though - if I had the ceiling for it, I would probably attempt to build an HO scale model of the tower.
  • Hand in hand with the first bullet, I want to model passenger operations at the terminal during the late 1940's to early 1950's. At least to some degree. The terminal platforms had 6 traction tracks, 12 railroad tracks, and a 9 track coach yard. I will most likely downsize this a bit. I also have no plans currently to model the traction piece at all, but who knows what may happen.

  • Multiple railroad operations for both passenger and freight. The main players in the downtown Cleveland area during this time frame were New York Central, Nickel Plate, Baltimore & Ohio, Big Four, Erie, Wheeling & Lake Erie, and Pennsylvania. Cleveland Union Terminal (C.U.T.) also had its own electrified line, more on that later though.

  • Riverfront operations. There were several locations on the riverfront where commodities such as ore, coal, grain, aggregate, and concrete were loaded and unloaded. At one time, the Whiskey Island ore dock with its four enormous Hulett unloaders was the largest ship-to-shore ore unloading operation in the world. 


Well, that's it for an introduction. Much more to come!